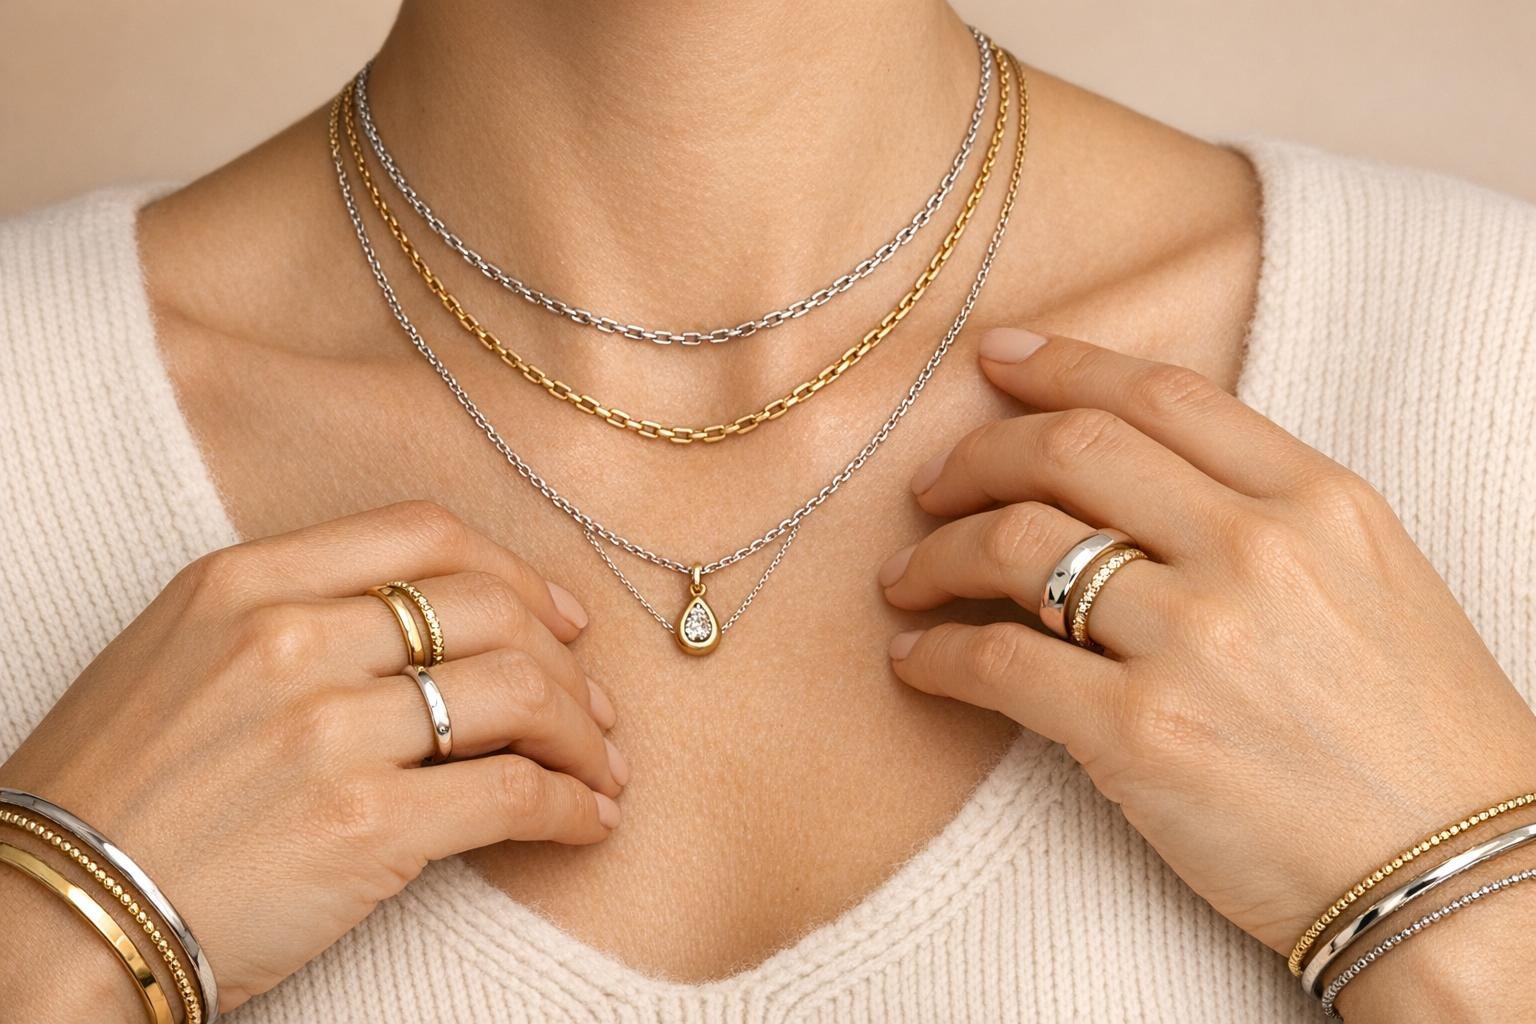
Layering accessories can instantly elevate your outfit when done right. It’s not about wearing everything you own – it’s about combining necklaces, rings, and bracelets in a way that feels intentional and stylish. Here’s the key takeaway: start with a standout piece, mix textures and metals thoughtfully, and balance proportions to avoid a cluttered look. Whether it’s layering necklaces with varying lengths, stacking bracelets with different materials, or combining bold and minimal rings, the goal is to create depth and personality.
Quick Tips:
- Necklaces: Use 1–2 inches of space between layers. Start with a choker or collar-length chain and build outward.
- Bracelets: Mix styles like cuffs, bangles, and chain bracelets. Stick to odd numbers (3, 5, or 7) for balance.
- Rings: Focus on one bold ring and pair it with thinner, simpler bands. Spread rings across fingers for symmetry.
- Mix Metals: Let one metal dominate (60–70%) and use a second as an accent.
- Occasion Matters: Keep it simple for work, playful for casual outings, and refined for formal events.
Layering is about showcasing your personalized fashion style while keeping the look polished. Start small, experiment, and find combinations that feel like you.
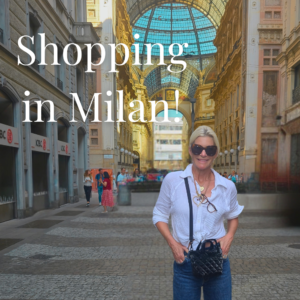
BRING THE BLING: How to accessorize in fashionable layers
sbb-itb-9502fca
Basic Principles of Accessory Layering
Mastering the art of layering accessories comes down to three key principles: creating a focal point, mixing metals with intention, and maintaining balanced proportions. These steps ensure that your accessories complement your outfit rather than overpower it, giving your look a polished and cohesive feel.
Choosing a Focal Point
Every layered look starts with an anchor piece – the standout item that grabs attention and sets the tone for the rest of your accessories. This could be anything from a vibrant cocktail ring to a bold gemstone pendant or an eye-catching bracelet. Once you’ve chosen your star piece, the rest of your jewelry should play a supporting role.
"Every great layered look needs an anchor. So start by choosing one star piece – a vibrant cocktail ring, a striking gemstone pendant or a bold bracelet – and build your jewelry layers around it."
- Jane Olagunju, Angara
A practical way to structure your look is by following the 2:1:1 rule: combine two simple pieces, one medium-impact piece, and one bold statement piece. This method avoids clutter and ensures your look has just the right amount of visual interest. For necklaces, your focal piece often works best as the middle or longest layer, creating a visually pleasing cascade. When it comes to rings, spread the visual weight by placing a bold ring on one finger, such as the index, and pairing it with thinner, more understated bands on other fingers.
Mixing Metals and Materials
Gone are the days when matching metals was the only way to style your jewelry. Modern trends embrace mixed metals, as long as it’s done thoughtfully. To keep your look cohesive, aim for one metal to make up 60–70% of your stack, using a second metal as an accent. This balance keeps the mix intentional while adding a contemporary flair. Bridge pieces, which already feature multiple metals, are a fantastic way to tie everything together seamlessly.
When mixing metals, consistency in finishes – whether matte, polished, or hammered – helps maintain harmony. Adding texture can also elevate your look without requiring more pieces. For instance, pair smooth snake chains with textured curb chains, or mix delicate rolo chains with bold paperclip links.
Balancing Proportions
Proportion is all about making sure your accessories suit your body type and outfit. For necklaces, leave 1–2 inches of space between layers to keep each piece visible and prevent tangling. This simple spacing trick is essential for keeping your look clean and organized.
Your body type and neckline also play a role. Shorter necks benefit from vertically oriented pieces, which create the illusion of length. Longer necks, on the other hand, can confidently pull off chokers and mid-length styles. Don’t forget to consider your clothing – V-necks pair well with pendants that mimic the V-shape, while high necklines like turtlenecks look best with longer chains (24 inches or more) that add verticality.
To add depth and prevent your look from feeling flat, mix different weights and widths. For example, pair chunky curb chains with finer, delicate pieces, or combine wide statement rings with thin, minimalist bands. This variety keeps your layers dynamic and visually interesting.
How to Layer Necklaces
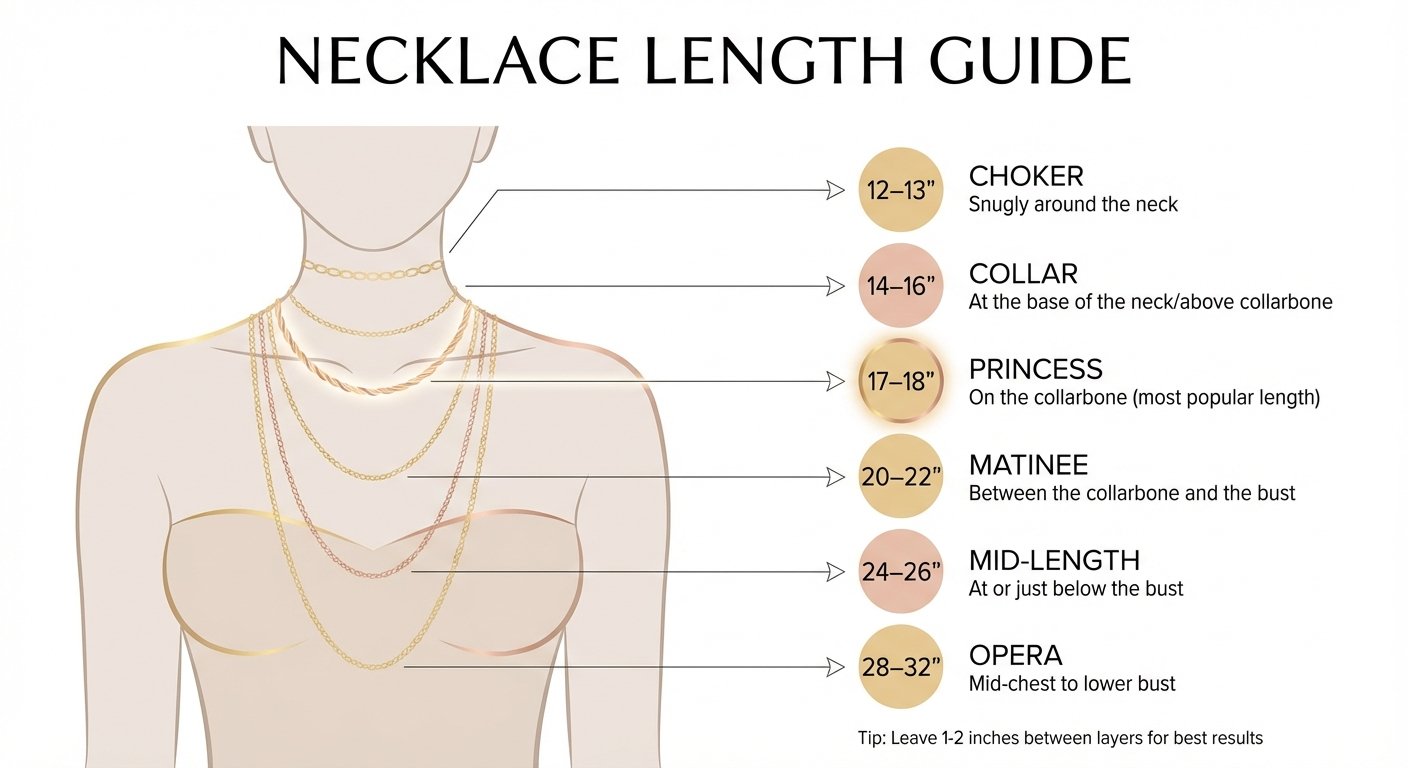
Necklace Length Guide: From Choker to Opera Style
Layering necklaces is a great way to add personality and depth to your look. By combining different lengths and styles, you can create a flattering and eye-catching effect that feels uniquely yours.
Selecting Necklace Lengths
When layering necklaces, aim for a 1–2-inch gap between each piece. Start with a base layer, like a choker (12–14 inches) or a collar-length necklace (14–16 inches), and build outward. A classic combination might include a 16-inch, 18-inch, and 22-inch necklace, creating an elegant cascading effect.
Keep in mind that pendants add to the total chain length. For example, a 16-inch chain with a 2-inch pendant will wear like an 18-inch chain. To figure out the best lengths for you, try wrapping a ribbon around your neck and adding 2 inches for a snug fit or 4–6 inches for a looser drape.
| Length | Name | Placement on Body |
|---|---|---|
| 12–13" | Choker | Snugly around the neck |
| 14–16" | Collar | At the base of the neck/above collarbone |
| 17–18" | Princess | On the collarbone (most popular length) |
| 20–22" | Matinee | Between the collarbone and the bust |
| 24–26" | Mid-Length | At or just below the bust |
| 28–32" | Opera | Mid-chest to lower bust |
Your neckline is another important factor. V-necks and scoop necks provide a perfect backdrop for layered necklaces, while high-neck tops or turtlenecks pair better with longer chains (24 inches or more) to avoid a cluttered look.
Once you’ve chosen your lengths, focus on mixing styles and pendants to make your layers stand out.
Pairing Styles and Pendants
Mixing chain textures is key to creating a visually interesting stack. For example, pair a sleek snake chain with a textured curb chain, or combine delicate rolo chains with bold paperclip links.
"Necklace layering is all about personal expression and finding balance between shine, shape, and simplicity." – Mejuri
Make a statement by choosing one standout piece to anchor your look, such as a bold pendant, birthstone, or nameplate. Then, complement it with simpler, supporting necklaces. To create a cohesive vibe, try a monochromatic gemstone palette featuring shades of the same color, like blue sapphire, aquamarine, and turquoise.
If you’re mixing metals, two-tone pieces can act as a bridge to tie the look together. To keep your chains from tangling, put them on in order from longest to shortest. For added convenience, use a layering clasp to keep everything aligned.
With these basics in place, you can easily tailor your layered necklaces for both casual and formal occasions.
Tips for Everyday and Formal Looks
Layered necklaces can work for any setting, from casual outings to elegant events.
For everyday wear, go for a relaxed vibe by mixing textures, charms, and metals. For instance, pair a delicate diamond pendant with a simple gold chain for a touch of sparkle, or layer beaded necklaces with polished links for added texture. Keep your stack to three necklaces or fewer to maintain an effortless look.
For formal events, opt for a more refined approach. As Rachel Gindi, Co-founder of Oradina, suggests:
"I love a choker paired with an extra-long chain or lariat necklace for a formal event. The key is to go with something dainty, that way your jewels won’t ‘overpower your outfit’".
A diamond tennis necklace makes a stunning middle layer, framed by finer, simpler chains for a touch of understated elegance.
Always match your necklaces to your outfit’s neckline. Y-shaped pendants pair beautifully with deep V-neck dresses, while opera-length chains (26–36 inches) complement high-neck gowns by elongating your silhouette. To balance your look, keep earrings minimal – think simple studs or small hoops – to avoid overwhelming your face.
How to Stack Bracelets
Stacking bracelets is a fun way to express your style while adding some flair to your wrists. The trick is to strike a balance between variety and coordination, so your stack looks thoughtfully arranged rather than random.
Combining Different Bracelet Types
Start with a centerpiece – a standout bracelet that sets the tone for your stack. This could be anything from a bold watch to a chunky cuff or a vibrant gemstone bracelet. Once you’ve chosen your anchor piece, build around it by mixing different styles.
- Bangles offer structure with their solid, unyielding shape, while cuffs are open-ended and easy to wear.
- Add movement and texture with chain bracelets, whether they’re delicate links or bold curb chains.
- For a touch of sophistication, include a tennis bracelet with a continuous line of diamonds or gemstones.
- Beaded bracelets bring in color and texture for a relaxed, bohemian vibe.
- Incorporating leather straps can add a rugged, edgy contrast to polished metal pieces.
"Stacking bracelets is an art form." – Rachel Akmakjian, Graduate Gemologist, BriteCo
A good rule of thumb? Stick to odd numbers – three, five, or seven bracelets – to create a balanced look. Combine different widths by pairing thick statement pieces with thinner chains, and use a rigid cuff or watch to keep everything from tangling.
Once you’ve chosen your bracelets, focus on balancing colors and materials for a cohesive finish.
Balancing Colors and Materials
Mixing metals has become a popular trend, so don’t shy away from combining gold tones like yellow and rose gold. To keep things cohesive, stick to two metal hues and distribute them evenly throughout your stack.
When it comes to color, you have a few options:
- A monochromatic palette uses gemstones in the same color family but with varying shades, like sapphire, aquamarine, and turquoise.
- For a bold contrast, go for complementary colors – those on opposite sides of the color wheel, such as blue sapphire paired with citrine.
- Analogous colors, like emerald and aquamarine, create a more harmonious, flowing look.
- Neutral tones, like diamonds or white gold, can act as a “reset” to balance brighter elements.
| Strategy | Description | Example |
|---|---|---|
| Complementary Colors | Opposites on the color wheel for bold contrast | Blue Sapphire + Citrine |
| Analogous Colors | Neighbors on the color wheel for harmony | Blue Topaz + Amethyst |
| Texture Contrast | Mixing rough and smooth finishes | Hammered Gold + Silk Cord |
| Weight Balance | Combining thick and thin pieces | One 10mm Cuff + Two 2mm Chains |
Adding texture is another way to elevate your stack. Try mixing hammered, matte, and polished metal finishes or pairing faceted gemstones with smooth cabochons. To avoid an overcrowded look, follow the 2:1:1 rule: two simple pieces, one medium-impact piece, and one bold statement bracelet.
Comfort and Wearability Tips
Once your stack looks great, make sure it feels good too. Wearing your bracelets on your non-dominant arm can help prevent them from interfering with everyday tasks like writing or typing. Opt for bracelets that fit securely to avoid constant shifting or tangling.
"Start with stacking bracelets on your non-dominant arm to become more accustomed to the look and feel. This placement will ensure that the bracelets don’t get in the way, as you move through your daily life." – Rachel Akmakjian, Graduate Gemologist, BriteCo
Keep your stack proportionate – about one-third to one-half of your forearm is a good guideline. If you’re using delicate materials like pearls or soft gemstones, add a buffer bracelet – something smooth like leather or polished metal – to prevent scratches. Avoid piling on too many charm bracelets, as they can make the stack look cluttered.
For work or other situations where your hands are busy, choose secure cuffs or slim chains over heavier, dangling pieces. If your stack starts feeling too heavy, remove a bracelet or two to maintain comfort.
How to Layer Rings
Just like layering necklaces or bracelets, stacking rings can elevate your overall look when done thoughtfully. The key is to create a cohesive style where each ring complements the others without making your hands feel overcrowded.
Balancing Bold and Minimal Designs
Start with a signature piece – like a bold gemstone or cocktail ring – that serves as the focal point of your stack. Then, build around it with thinner, simpler bands to keep the look balanced and uncluttered.
"If you wear a standout… gemstone ring, let it be the focal point and keep the surrounding bands more uncomplicated, which ensures that your style remains elegant and sophisticated." – Jacquie Aiche
A helpful guideline is the 2:1:1 rule: pair two simple rings with one medium-impact ring and one statement piece for a balanced look. Experiment with different widths by matching wide, ornate bands with delicate stacking rings. Don’t shy away from mixing textures – a polished rose gold band can look stunning next to a hammered or matte finish.
"Mixing bold statement pieces with delicate ones creates variety and keeps everything from looking weighed down." – Yana Matherly, Sylvan’s Jewelers
Leave one or two fingers bare to create "negative space." This gives your rings room to shine without overwhelming the eye. If you’re stacking multiple rings on one finger, keep in mind they’ll feel tighter than wearing them solo, so you might need to size up slightly for comfort.
Once you’ve chosen your rings, consider how to arrange them across your fingers for symmetry and balance.
Using Finger Placement Strategically
Where you choose to place your rings can make or break your overall look. Spreading them across different fingers creates balance, while stacking too many on one or two fingers can feel haphazard. Aim for three to five rings per hand for a curated, intentional style.
Each finger has its own visual presence and traditional symbolism, which can guide your choices. The index finger is perfect for bold cocktail rings or signets that demand attention. The middle finger works well for symmetrical stacks or a central statement ring. Your ring finger naturally suits wedding bands, eternity rings, or delicate sets, while the pinky is ideal for dainty bands or small signets. Don’t forget the thumb, which can carry bold bands or unique pieces that stand out.
| Finger | Symbolism | Suggested Ring Styles |
|---|---|---|
| Thumb | Individuality & Creativity | Bold bands or statement rings |
| Index | Authority & Power | Large cocktail rings or signets |
| Middle | Balance & Identity | Symmetrical stacks or focal rings |
| Ring | Romance & Commitment | Wedding bands, eternity stacks, or delicate sets |
| Pinky | Intelligence & Intuition | Dainty bands or small signets |
For a sleek gradient effect, place your widest, most ornate ring on your middle finger and taper down to thinner, simpler rings on the neighboring fingers. Midi rings – those worn above the lower knuckle – add vertical dimension and a touch of bohemian flair. Just keep mobility in mind; wearing more than three or four rings on one finger can feel restrictive.
With your arrangement in place, let your personal style shine through in your choices.
Personalizing Your Ring Stack
Your ring stack is an extension of your personality, and mixing sentimental pieces with modern designs can make it uniquely yours. Add rings that carry meaning – birthstones for loved ones, anniversary bands, or pieces commemorating special milestones.
"Every ring can represent unforgettable memories and milestones along life’s journey." – GIA
Don’t be afraid to mix styles and eras. An Art Deco vintage ring can pair beautifully with sleek, modern bands. Blend metals too – gone are the days of sticking to just one. Yellow gold, rose gold, and silver can harmonize when evenly distributed across your hand. Use neutral bands or diamonds as "visual resets" between bold gemstones to keep the stack cohesive.
"Thin bands are the backbone of a good stack. Once you’ve got that down, you can add texture (like braided bands), play with different shapes (like domes), or bring in a statement ring to make it feel more like you." – Xenia Lally, Fashion Director at Mejuri
If you’re new to stacking, start simple with two rings in the same metal but different thicknesses. As you get more comfortable, gradually add more pieces. Coordinate your stack with your nail polish – neutral or burgundy shades create a polished look, while bright colors add a playful vibe. The beauty of stacking is that it grows with you, becoming more personal and meaningful over time.
Tips for Successful Accessory Layering
Mastering accessory layering can elevate any outfit, but it requires a thoughtful approach. The line between a polished look and an overwhelming one often comes down to a few key techniques.
Avoiding Overcrowding
When layering, it’s important to let each piece shine. Avoid piling on multiple statement items that compete for attention – this can leave your look feeling chaotic instead of cohesive. For rings, distribute them across both hands instead of stacking too many on one finger. Similarly, space out necklaces to keep each one visible and moving freely.
Necklace tangling is a common challenge. Chains of similar length or weight often get tangled, disrupting your style. To avoid this, pair heavier chains, like snake or box styles, with lighter ones. The heavier pieces tend to stay in place, while lighter ones are more prone to shifting.
"The first thing I always suggest is to purchase a layering clasp (necklace detangler)." – Alison Bruhn, Fashion Stylist
A layering clasp is a simple tool that keeps multiple necklaces anchored at the back, preventing them from twisting together during wear.
Forget the outdated rule of matching metals. Modern style encourages mixing metals, but for a balanced look, aim for one dominant metal to make up about 60-70% of your stack.
Adapting to Different Occasions
Your layering choices should reflect the setting. In professional environments, stick to two or three carefully chosen pieces that enhance your outfit without drawing too much attention. Keep the spacing precise, and stick to a single metal for a polished, cohesive look.
For casual outings, feel free to experiment. This is where the #neckmess trend comes into play – a playful, "more is more" approach that combines textures, colors, and metals. Layering three to five pieces can instantly elevate a simple T-shirt into a statement look.
"More is more and less is a bore." – Iris Apfel, Style Icon
At special events, focus on precision and elegance. Choose a high-quality focal piece, like a diamond tennis necklace or a vibrant gemstone, and build your layers around it. In formal settings, restraint often makes the strongest impression.
| Occasion | Recommended Layering Style | Key Tip |
|---|---|---|
| Work/Professional | Minimalist (2-3 pieces) | Keep spacing precise and metals consistent |
| Casual Outings | Bold (#Neckmess) | Mix textures, colors, and varied chain weights |
| Special Events | Elegant/High-End | Use a single focal point, like a tennis necklace |
Matching your accessories to your neckline is another essential tip. V-necks pair well with V-shaped or Y-shaped pendants, while high necklines, like turtlenecks, look best with longer chains (24 inches or more) layered over the fabric for a lengthening effect.
Caring for Your Accessories
Once you’ve perfected your layered look, taking care of your pieces will keep them in great condition. Use jewelry trays, hooks, or individual pouches to store your items separately and prevent tangles. Multi-hook organizers are especially handy for sets you wear often.
Friction can weaken links and dull finishes over time. Give your accessories a break between wears to minimize wear and tear. Avoid constant fidgeting, which can cause unnecessary twisting and movement. When removing layered necklaces, take them off as a group rather than one by one to prevent chains from wrapping around each other.
Delicate items like pearls should be positioned away from harder metal chains to avoid scratches. Pearls and herringbone chains are particularly fragile and pair best with lighter chains for added protection. If you encounter a knot, lay the piece flat and carefully loosen it with safety pins. For stubborn tangles, lightly dust the knot with baby powder to reduce friction.
For valuable or intricate pieces, don’t risk damage with DIY fixes. Instead, consult a professional jeweler for assistance.
Conclusion
Layering accessories is all about creating a look that feels personal and polished. Whether you’re stacking delicate rings, mixing metals with necklaces, or building a bracelet collection, each piece adds something special to your overall style. The beauty of layering lies in its ability to take even the simplest outfit and turn it into a fashion statement that reflects who you are and how you feel.
"When layered thoughtfully, each piece feels intentional, elevated and unmistakably ‘you’." – Jane Olagunju, Stylist, Angara
The basics – picking a focal point, keeping a bit of space between layers, mixing textures, and considering the occasion – are your starting tools. But the real magic happens when you make these rules your own. If you’re new to layering, start small with two or three pieces and build from there as you figure out what works for you. There’s no one-size-fits-all formula here; the best approach is the one that makes you feel confident and true to yourself. This mix of technique and personal flair turns your accessories into a bold statement.
Layering does more than just enhance your outfit – it boosts your confidence and can even spark conversations. So grab your favorite pieces, try something new, and define a look that feels unmistakably yours. Your accessories are waiting to help you express your style.
FAQs
How can I choose the perfect anchor piece when layering accessories?
To craft a stylish layered look, start with an anchor piece – the star of your accessories. This could be a bold necklace, a striking bracelet, or a standout ring. The anchor sets the vibe for your outfit and should be the most attention-grabbing item in your stack.
For necklaces, the anchor is usually the longest or most unique piece, like a pendant around 24 inches long. Pair it with shorter, more delicate chains (14–16 inches) in the same metal tone to frame the look without overpowering it. When layering bracelets or rings, pick one standout design and pair it with simpler pieces that complement its color or texture.
Make sure your anchor piece matches your neckline and outfit, feels comfortable, and creates a balanced look. The supporting accessories should highlight the anchor, working together to create a polished and stylish ensemble.
How can I mix metals in my accessories without clashing?
Mixing metals can add a stylish edge to your outfit when approached with care. A great way to start is by choosing a piece that already blends metals, like a two-tone necklace or a mixed-metal ring. This serves as a solid base to build on, making it easier to tie your accessories together. From there, add complementary pieces in silver, gold, or rose gold, ensuring they enhance rather than overshadow the overall look.
To keep your style refined, focus on one standout accessory – perhaps a gemstone ring or a bold bracelet – to act as the centerpiece. Surround this with layers of mixed-metal accents that vary in texture and size. For example, pair a sleek gold bangle with a brushed silver cuff, or layer delicate chains with chunkier statement pieces. This contrast creates depth and keeps the ensemble visually engaging.
To bring everything together, look for a unifying detail, like a shared gemstone or a consistent design element across your accessories. Warm tones like yellow and rose gold create a soft, romantic aesthetic, while cooler metals like silver and platinum lend a contemporary, polished feel. By starting with subtle combinations and experimenting, you can craft a balanced mixed-metal look that complements any outfit effortlessly.
What’s the best way to keep layered necklaces from tangling?
To keep layered necklaces from tangling, start by selecting pieces with at least a 2-inch difference in length and varying chain thicknesses. This natural separation makes tangling less likely. For added convenience, you can use a layering clasp or a small jump ring to connect the necklaces at a single point, ensuring they stay aligned throughout the day.
If you want even more security, consider using a necklace spacer or detangler on each chain before wearing them. When putting your necklaces on, begin with the longest one, then add the medium-length, and finish with the shortest. To keep your set organized when not in use, store them together in a pouch or jewelry box. These simple tricks will help your necklaces stay tidy and stylish without the hassle of tangles!